Hacking my vacuum cleaner - Part 1
And one day I thought maybe I could hack that robot vacuum cleaner I have in a corner. I googled how to hack a Xiaomi vacuum cleaner and found Dennis Giese’s website https://dontvacuum.me/
Gathering information
My vacuum cleaner is the “Xiaomi - Robot 2 Pro +” and looking at the supported devices in https://robotinfo.dev/ I found it but with a different model id.

Mine is the p2074 and looks quite similar to the p2041! Same name, same specs but different model…
I checked the materials and decided to try the serial method to access the debug terminal of the vacuum cleaner despite the mismatch of the model, who knows… maybe it just works…
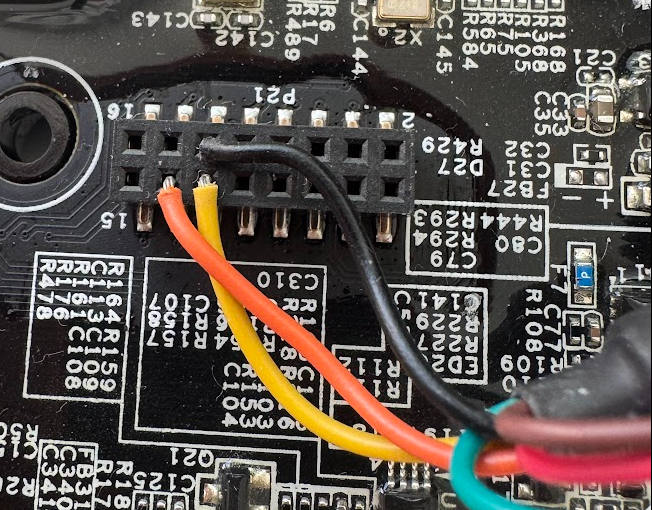
Serial debug connection
I took my USB2Serial 3.3v adapter and connected it according to the pinout explained in: https://builder.dontvacuum.me/dreameadapter/dreame.pdf (page 17). Just GND, RX and TX are needed in this case.
Open a serial connection through the USB2Serial adaptor:
$ sudo picocom /dev/ttyUSB0 -b115200
And turned the vacuum cleaner on and… It worked!!! I got the expected login shell explained in https://builder.dontvacuum.me/dreameadapter/dreame.pdf (page 25) therefore I followed the rest of steps explained in https://builder.dontvacuum.me/dreame/cmds-reset.txt. Basically press the reset button shortly while booting.
Unfortunately I don’t have screnshots of this step as I was too anxious to see if it works what indeed happened… But it was something like:
p2041_login:
Surprise here! The prompt reports the supported model in the docs (the one I found similar to my p2074) but not the expected p2074.
Generate the root password
I put my vacuum cleaner serial number (no need to change the model from p2074 to p2041) in https://builder.dontvacuum.me/dreamepassword.php. The password generator just worked without the need of changing the model in the serial number or use the command method but I executed the command anyway just to verify if I get the same result and indeed, I got the same password.
$ echo -n "P2074XXXXXXXXXXXXX" | md5sum | base64
Root access
The moment of truth arrived! Time to see if the password works and I can login into the vacuum cleaner.
Yes!, again no screenshots, but I got something like:
[root@p2041_release:~]#
Which is the root prompt after rooting it as explained below…
Device information
The https://builder.dontvacuum.me/dreame/cmds-reset.txt explains how to get some important information of the device.
The command cat /etc/os-release showed:
[root@p2041_release:~]# cat /etc/os-release
{
    "release_date":"2022-11-11 19:14:58",
    "product": "p2041",
    "fw_mcu_ota_ver": "0.8.1",
    "fw_arm_ver": "4.3.3_1111"
}
On disaster backup
Again, following the document I backed up the relevant factory configuration and calibration data.
Wifi connection
In this step, things went tricky… I cound’t run:
[root@p2041_release:~]# wifi_cli -c "SSID" "password"
or
[root@p2041_release:~]# wifi_connect "SSID" "password"
So I started trying things, I found a script called ‘wifi_start.sh’ and tried it:
[root@p2041_release:~]# wifi_start.sh SELECT_MASTER "SSID" "password"
Still no success, but I found the wpa_cli installed and the wpa_supplicant process running.
[root@p2041_release:~]# ps | grep wpa
 1177 root      0:00 wpa_supplicant -Dnl80211 -B -s -iwlan0 -c/data/config/wifi/wpa_supplicant.conf
Let’s try this way!
[root@p2041_release:~]# wpa_cli -i wlan0
Summary of wpa_cli commands:
>: command sent i.e: scan<: response got fromwpa_cli
> scan
< OK
< <3>CTRL-EVENT-SCAN-STARTED
< <3>CTRL-EVENT-SCAN-RESULTS
< <3>WPS-AP-AVAILABLE
< <3>CTRL-EVENT-NETWORK-NOT-FOUND

> scan_results
< > bssid / frequency / signal level / flags / ssid
<   {network info:  XXXX XXXX XXXX    XXXX    XXXX    XXXX}
<   {network info:  XXXX XXXX XXXX    XXXX    XXXX    XXXX}
<   {network info:  XXXX XXXX XXXX    XXXX    XXXX    XXXX}

> add_network
< {new network id i.e: 1}
> set_network {network id} ssid "SSID"
> set_network {network id} psk "password"
enable_network {network id}
save_config
quit
Good, up to this point we should be connected to our WiFi network, but we don’t have an IP yet, let’s request it to the DHCP server of our WiFi router.
[root@p2041_release:~]# udhpc.sh
At this point I got an IPv4 in the wlan0 adapter:
[root@p2041_release:~]# ip a show dev wlan0
Permanent root
In order to keep a permanent root access, the easiest way would be to flash our device with a generated firmware by dustbuilder. But remember that my vacuum cleaner (the exact model) wasn’t among the supported ones.
Jump of fait and use https://builder.dontvacuum.me/_dreame_p2041.html to generate a firmware, flash it and see what happens? Of course! Since I started with this, I found references to the p2041model. Like in the very first prompt and in the /etc/os_release file. Feels like after all the p2074 is a rebranded p2041 and nothing more. Probably, due to diffrent markets Asia/Europe, Xiaomi brands their devices differently…
I read in the presentations that there is a A|B partition schema, so maybe in the worse case I’d still have a way to recover the device.
I generated the firmware using dustbuilder but this time I got an error while setting the serial number (model not supported). I changed the model id part in the serial number field and continued.
Few minutes later, I got an email with the link to download the generated firmware and I proceeded to download and flash it.
[root@p2041_release:~]# cd /tmp
[root@p2041_release:~]# wget --no-check-certificate {url-of-firmware.tar.gz}
[root@p2041_release:~]# tar -xzvf {name-of-firmware.tar.gz}
[root@p2041_release:~]# ./install.sh
The device restared and voilà! Not asking for root password anymore!!!
The device was rooted successfully and it still reports it’s original model id.
Next post: Hacking my vacuum cleaner - Part 2